Safety Precautions
Always unplug the sewing machine when unattended, before cleaning, or during maintenance to avoid electric shock․ Handle sharp objects like needles and blades with care․ Ensure emergency procedures are understood and accessible․
1․1 Electrical Safety
Always unplug the sewing machine from the electrical outlet immediately after use and before cleaning or performing maintenance․ Never leave the machine unattended while plugged in to reduce the risk of electric shock․ Avoid using damaged cords or plugs, as they can pose serious safety hazards․ Ensure the machine is connected to a suitable electrical outlet and avoid overloading circuits․ Keep the sewing machine away from water and moisture to prevent electrical accidents․ If the machine is not in use, store it in a dry place․ Follow all safety guidelines provided in the manual to ensure safe operation and prevent electrical hazards․
1․2 Handling Sharp Objects
When handling needles, pins, and other sharp objects, exercise extreme caution to avoid injuries․ Always insert and remove needles carefully, using a needle clamp or screwdriver as recommended․ Keep sharp tools away from children․ Store needles and pins in a protective case when not in use to prevent accidents․ If a needle breaks, stop the machine immediately and remove the broken piece to ensure safe operation․ Use gloves if necessary for added protection․ Regularly inspect needles for damage or wear and replace them as needed to maintain safety and prevent needle breakage during sewing․ Always handle sharp objects with attention and care to ensure a safe sewing environment․
1․3 Emergency Procedures
In case of an emergency, immediately turn off the power switch and unplug the sewing machine from the electrical outlet․ If a needle breaks, stop the machine at once and carefully remove the broken piece․ Never attempt to repair the machine while it is plugged in․ If the machine malfunctions or emits unusual noises, disconnect it from the power source and consult the user manual or contact Brother support․ Keep emergency contact information handy․ Always prioritize safety to prevent accidents and ensure proper machine function․ Regular maintenance and adherence to safety guidelines can help minimize the risk of emergencies․ Stay calm and follow the recommended procedures to handle any unexpected situations effectively․
Machine Overview
The Brother LS-2125 is a compact mechanical sewing machine perfect for basic tasks․ It features a free arm, 17 built-in stitches, and essential accessories, weighing 13 pounds for easy portability․
2․1 Principal Parts of the Sewing Machine
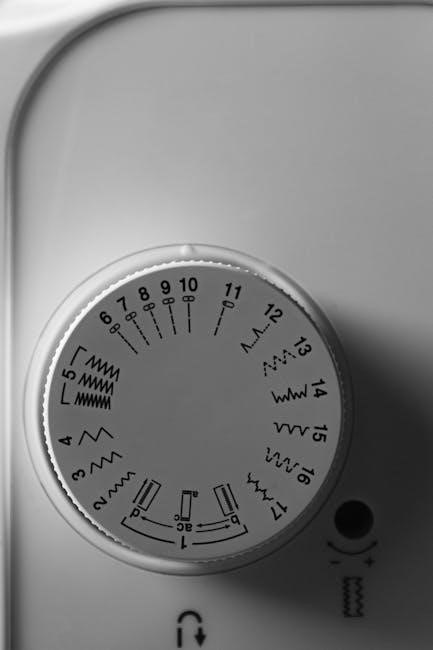
The Brother LS-2125 sewing machine features several key components designed for efficient operation․ The pattern selection dial allows users to choose from 17 built-in stitches, including straight, zigzag, and buttonhole options․ The thread take-up lever regulates thread tension, ensuring consistent stitching․ An extension table with accessory storage provides a spacious work area, while the upper tension control dial fine-tunes thread tightness․ The reverse sewing lever enables backward stitching for securing seams․ Additional components include the needle plate, which supports fabric during sewing, and the shuttle hook, which facilitates thread looping․ These parts work together to ensure precise and versatile sewing performance․
2․2 Accessories Included
The Brother LS-2125 sewing machine comes with a variety of accessories to enhance functionality․ Included are a buttonhole foot, zipper foot, and button sewing foot, each designed for specific tasks like creating buttonholes or sewing zippers․ A needle set provides versatile options for different fabric types, while bobbins ensure smooth thread delivery․ Additional items include a darning plate for repairing fabrics, a screwdriver for adjustments, and an extra spool pin for dual-thread operations․ These accessories, along with a foot controller and instructional materials, make the machine versatile and user-friendly, catering to both basic and advanced sewing needs․ The included instructional DVD guides users through setup and operation, ensuring a seamless experience․
Operating the Sewing Machine
Turn on the machine and select stitches using the pattern dial․ Use the foot controller to regulate sewing speed․ Engage the reverse lever for backstitching․ For free-arm sewing, remove the extension table․
3․1 Threading the Machine
To thread the Brother LS-2125 sewing machine, start by turning the balance wheel toward you to raise the take-up lever; Place the thread on the spool pin and guide it through the tension discs․ Gently pull the thread to ensure it seats properly in the tension mechanism․ Next, insert the thread into the needle bar groove and lower the take-up lever․ For the bobbin, wind the thread around the bobbin winder, then insert it into the bobbin case․ Pull the end of the bobbin thread to seat it, ensuring both upper and lower threads are properly aligned․ Always unplug the machine before threading to avoid accidental start-up․
3․2 Basic Sewing Functions
The Brother LS-2125 sewing machine offers straightforward operation for basic sewing tasks․ Begin by turning on the machine using the main power switch․ Use the foot controller to start sewing, applying gentle pressure for low speed and increasing for higher speeds․ Select the desired stitch using the pattern selection dial, which includes options like straight stitch, zigzag, and stretch stitches․ To sew in reverse, press the reverse sewing lever down while operating the foot controller․ Always ensure the presser foot is lowered before starting to sew for proper fabric control․ The extension table provides a stable surface for larger projects, and the free-arm design allows easy access for sewing cuffs or sleeves․ Keep the fabric moving smoothly and evenly to achieve consistent stitch quality․
3․3 Using the Presser Foot
The presser foot is essential for maintaining fabric stability during sewing․ To use it effectively, ensure the presser foot is lowered before starting to sew․ For changing the presser foot, raise the needle to its highest position and lift the presser foot lever․ Snap-on the desired presser foot securely․ The presser foot screw (part #9) should be tightened firmly to hold it in place․ For delicate or thick fabrics, adjust the presser foot pressure as needed․ Use the presser foot lifter to raise the foot for easy fabric placement․ Always lower the presser foot before sewing to ensure even stitching and prevent fabric slippage․ This feature helps in achieving consistent stitch quality across various fabric types․
Maintenance and Cleaning
Regularly clean the machine with a soft brush to remove dust and debris․ Unplug before cleaning or lubricating․ Lubricate internal parts as needed to ensure smooth operation․
4․1 Cleaning the Machine
To maintain your Brother LS-2125 sewing machine, turn off the power switch and unplug it from the electrical outlet․ Raise the needle to its highest position and lower the presser foot․ Use a soft brush to gently remove dust and debris from the exterior and internal mechanisms, such as the shuttle hook and feed dogs․ For stubborn dirt, lightly dampen a cloth with water, but avoid liquid contact with electrical components․ Regular cleaning ensures smooth operation and prevents damage․ If unsure about internal spring mechanisms, refer to the manual for guidance․ Always reassemble and test the machine after cleaning to ensure proper function․
4․2 Lubricating the Machine
Lubricate the Brother LS-2125 sewing machine regularly to ensure smooth operation․ Use high-quality sewing machine oil, applying a few drops to the shuttle hook and feed dog mechanisms․ Turn the handwheel gently to distribute the oil evenly․ Avoid over-lubrication, as it may attract dust and cause issues․ Use a soft cloth to wipe away excess oil․ Always unplug the machine before lubricating to prevent accidental start-ups․ Refer to the manual for specific lubrication points and frequency․ Proper lubrication extends the machine’s lifespan and maintains optimal performance․ If unsure, consult the instructional guide for detailed steps to avoid damage․
Troubleshooting Common Issues
Identify common issues like thread breakage or poor stitch quality․ Check thread tension, clean the machine, and ensure proper needle alignment․ Consult the manual for solutions․
5․1 Thread Breakage
Thread breakage is often caused by incorrect tension settings, improper needle installation, or using low-quality thread․ To resolve, adjust the upper and bobbin tension according to the manual․ Ensure the needle is installed correctly and aligned with the fabric․ Use high-quality thread suitable for your fabric type․ Regularly clean the machine to remove debris that may interfere with thread flow․ If the issue persists, check for loose connections or damaged parts․ Always test sew on a scrap fabric before starting your project to ensure proper thread flow and tension settings․
5․2 Poor Stitch Quality
Poor stitch quality can result from incorrect thread tension, using the wrong needle size, or improper fabric handling․ Adjust the upper and bobbin tension as specified in the manual․ Ensure the needle is suitable for the fabric type and that it is installed correctly․ Use high-quality thread that matches your fabric to prevent uneven stitching․ If stitches are loose or tight, check the tension dials and adjust them accordingly․ Ensure the presser foot is lowered to maintain consistent fabric feed․ Regularly clean and oil the machine to ensure smooth operation․ Test sew on a scrap fabric before starting your project to ensure proper stitch formation and alignment․